
Combat is a very exciting and fun activity to take part in A Tempest Season. Combat in the game is easy to understand but hard to master. This section will explain the fundamentals of combat and the commands that are used within. Combat consists of three aspects: attacks, defenses and risks.
Contents
Attacking
The very first point about the combat system is it’s NOT automatic. You have to input your attacks each round. This offers a more interactive and rewarding type of play style.
Important!
Fighter Styles are automatic and do not require much input from the player. So if you prefer a more automatic play style consider rolling a Fighter.
Attacking consists of one of the following activities: melee attacks, casting a spell(Mages), praying for a gift(Clerics), or using a hostile ability.
Basic Attacks
There are 3 basic types of attacks per type of weapon. Any class can uses these basic attacks.
The three types of weapons are sharp, blunt and thrust weapons.
| Weapon Types | Examples |
| Sharp | Some daggers, Swords, Axes |
| Blunt | Maces and Hammers |
| Thrust | Some daggers, Spears, Pole-arms |
To execute one of these basic attacks, refer to the following tables. The syntax for each attack is:
<attack name> <target>
Example: slash stalker
Important!
The game remembers your last attacked target. After typing slash stalker, you may simply type slash to attack again.
Most attacks cost stamina to use with the exception of Low and Medium attacks.
Sharp Weapons
| Attack | Damage | Accuracy | Risk | Description |
| Slash | Low | High | Medium Decrease | An accurate slashing attack that does low damage without compromising your position (risk). Costs no stamina. |
| Slice | Medium | Medium | Low Increase | A slicing attack that does medium damage which lowers your position(risk) slightly. Costs no stamina. |
| Cleave | High | Low | High Increase | A powerful blow that does high damage but increases your risk by a sizable amount. |
Blunt Weapons
| Attack | Damage | Accuracy | Risk | Description |
| Pound | Low | High | Medium Decrease | An accurate pound attack that does low damage without comprising your position (risk). Costs no stamina. |
| Crush | Medium | Medium | Low Increase | A crushing attack that does medium damage which lowers your position(risk) slightly. Costs no stamina. |
| Smash | High | Low | High Increase | A powerful blow that does high damage but increases your risk by a sizable amount. |
Thrust Weapons
| Attack | Damage | Accuracy | Risk | Description |
| Jab | Low | High | Medium Decrease | An accurate jab attack that does low damage without comprising your position (risk). Costs no stamina. |
| Stab | Medium | Medium | Low Increase | A stabbing attack that does medium damage which lowers your position(risk) slightly. Costs no stamina. |
| Thrust | High | Low | High Increase | A powerful blow that does high damage but increases your risk by a sizable amount. |
Ranged Attacks
Ranged attacks consist of using a bow, crossbow or firearm and a projectile to deal damage. Below, lies more information regarding these types of attacks.
Ranged Weapon Types
There are three types of ranged weapons. Not every ranged weapon is considered a main armament.
| Weapon Type | Main Armament | Description |
| Bow | Yes | Short bows, long bows, badger bows etc. |
| Crossbow | No | Windup crossbows, slybows, hand crossbows, etc |
| Firearm | Yes | Muskets, hand cannons, and blunderbusses |
Crossbows require a lengthy windup time but they fire instantly and deal double damage.
Ranged Attacks
There are 3 basic types of attacks for ranged weapons. Any class can uses these basic range attacks.
| Attack Type | Description |
| Rapid | A quick shot that does low damage but isn’t risky. |
| Deftly | A normal shot, does good damage and has low risk. |
| Precisely | A lengthy shot where the aim is acquired before shooting. Does the highest damage and is the riskiest. |
To execute one of these basic attacks, the fire command is used.
The syntax for each attack is:
fire <attack name> <target>
Example: fire deftly stalker
Important!
Bows receive a 50% damage increase if used beyond 2 units (10 feet) of a target. Advance or retreat before battle to do maximum damage. See this for more information: Movement and DistanceProjectiles
There are several types of projectiles and heads for ranged weapons, each with various effects:
| Type | Weapon | Description |
| Broadhead | Bow, Crossbow | -10% dam vs plate armor, +10% vs chain |
| Bodkin | Bow, Crossbow | -15% dam vs plate armor, causes larger wounds |
| Blunt | Bow, Crossbow | -10% dam vs plate armor, causes no wounds, lower overall damage, stuns target (chance based on material) |
| Round Bullet | Firearm | -10% dam vs plate armor, +10% vs chain |
Projectiles can get stuck in a wound, which will prevent it from healing (closing). It must be removed before healing can take place.
Additionally, projectiles can be retrieved after battle, either from the corpse or from the ground on missed shots.
Loading Ranged Weapons
Generally, to use a ranged weapon, ammunition must be present. For bows and crossbows, a quiver must be worn in the quiver slot. When a bow is fired, an arrow is nocked automatically. Crossbows and firearms must be manually reloaded.
To load a crossbow or firearm, use the reload command.
reload
Example: reload
Reload reloads the current crossbow or firearm with ammo in your quiver or inventory.
Class Attacks
Some classes have special attacks. Fighters and Rogues are two classes that can acquire special melee attacks. These attacks can be used with any weapon.
Fighter Special Attacks
| Attack | Damage | Accuracy | Risk | Description |
| Dispatch | High | Medium | Low Increase | A powerful upward swing of a weapon dealing a great deal of damage. This attack does more damage than other high damaging attacks, and also raises your risk less. Most fighters live and die by dispatch. |
| Expose | Very Low | High | High Decrease | A skilled fighter has the ability to find flaws and openings in an opponent’s defense. The fighter uses these to their advantage by exposing them, unbalancing and then gaining the upper hand in the situation. This attack does low damage, but has a very high chance to hit. If it’s successful the fighter lowers their risk by a very high amount. |
| Vanquish | Very High | Medium | Low Increase | Vanquish is an extremely strong attack available to fighters. The form of the move consists of the fighter stepping forward and then putting all their might into the swing. The weapon then gathers the force that it needs to deal high damage to the target. It is more powerful than dispatch.Vanquish can be learned at the trainer in Tralisia. |
Rogue Special Attacks
Rogues have access to the following special attacks:
| Attack | Damage | Accuracy | Risk | Description |
| Circle | Very High | Low | Extreme Increase | The rogue circles around their target and tries to land a blow to the side or even back. This is a very risky attack, so your risk is increased by a great deal. If this lands it will deal a great deal amount of damage. |
| Backstab | 2x Damage | High | High Increase | Backstab is an exclusive only skill to the Rogue class. It may be used only when the Rogue is in hiding, and if successful it will deal double the damage of a normal attack. It has a low parry percent chance. |
| Impale | Extreme | Low | Extreme Increase | Impale consists of the rogue lunging at their victim, hoping to plunge their weapon deep into their target! Combining this with a weak attack like Slash is a solid tactic to deal maximum damage. |
Casting Magic
Mages are able to cast magical spells. The syntax to do so is:
cast ‘spell name’ <target>
For example: cast ‘fire ball’ stalker
Important!
To see your spells, type spells.To learn more about how spells and other abilities work visit the Abilities page.
Praying for Gifts
Clerics are able to pray to their Entity for gifts. The syntax to do so is:
pray ‘gift name’ <target> [<favors>|min|max]
For example:
pray ‘healing rains’ dayrinni 10 (prays healing rains on Dayrinni for 10 favors)
pray ‘healing rains’ dayrinni (prays healing rains on Dayrinni for the minimum amount of favors)
pray ‘healing rains’ dayrinni min (prays healing rains on Dayrinni for the minimum amount of favors)
pray ‘healing rains’ dayrinni max (prays healing rains on Dayrinni for the maxium amount of favors)
Clerics are able to boost up their gifts by applying Favors (their resource). The more favors the stronger the gift!
Important!
You can use MIN or MAX for the favor cost. This will spend the correct amount of favors. If you leave the favor cost off, it will default to the MIN.Important!
To see your gifts, type gifts.To learn more about how gifts and other abilities work visit the Abilities page.
Using Skills
Any class can use skills. The syntax to do so is:
use ‘skill name’ <target>
Example: use kick dayrinni
Important!
To see your skills, type skills.Notice
Skills and commands work in a special way. If you enter a command that does not exist in the game, a lookup will automatically be done for abilities. This means you do not have to always supply the word use. For example, you will be able to type kick dayrinni rather than use kick dayrinni.
To learn more about how skills and other abilities work visit the Abilities page.
What Attacks Can I Use?
To check what attacks you can use, simply type: attackinfo. This command will show the available attacks to you.

Available Attacks
Important!
Make sure you equip a weapon prior to using this command! Remember, weapon attacks are based on weapon type.Determining Attack Success
Determining the success of an attack is easy: a check is done with the attacker’s attack rating vs the defender’s defense rating. The difference is taken and then a linear percent scale is used (5% in each direction) from 50%. If the attack and defense ratings are equal, the attack has a 50% chance to be successful. If the attack rating is 1 higher than the defense rating, then the attack has a 55% chance to be successful.
Characters gain +1 to attack and defense per level. A character at level 100 will have a 100 attack and 100 defense.
Important!
To determine the basic success rate for your class(Melee for Fighters, Rogues and Clerics, Magic for Mages), simply look at a NPC.Notice
The success rate is not displayed while looking at other players.Attack Skills
Each class can learn multiple attack skills. These include weapon skills, sorcery and praying for Clerics. The higher level these skills are the larger the attack bonus for that type of attack. The following chart explains each skill:
| Skill | Attack Type | Who Uses | Description |
| Sword | Weapon | Anyone | Raises attack rating while using swords. |
| Axe | Weapon | Anyone | Raises attack rating while using axes. |
| Dagger | Weapon | Anyone | Raises attack rating while using daggers. |
| Mace | Weapon | Anyone | Raises attack rating while using maces and hammers. |
| Pole-arm | Weapon | Anyone | Raises attack rating while using spears and pole-arms. |
| Archery | Weapon | Anyone | Raises attack rating while using bows and crossbows. |
| Firearms | Weapon | Anyone | Raises attack rating while using firearms. |
| Sorcery | Magic | Mages and Arcanists | Raises attack rating while casting hostile magic and evocations. |
| Praying | Gifts/Holy | Clerics and Templars | Raises attack rating while praying for hostile gifts. |
| Exsanguinate | Blood Rites | Blood Shamans | Raises attack rating while performing hostile blood rites. |
It’s very beneficial to raise your main attack skill as high as possible as soon as possible. A Fighter and Rogue should focus on their melee attack, a Mage on Sorcery and a Cleric on Praying.
Important!
You may learn different weapon skills at any time! Simply visit the trainer in Tralisia!Modifiers
Abilities, classes, races and temporary buffs/debuffs all modify a character’s attack and defense ratings so the exact percentage varies. These temporary affects can be seen in the ‘score’ screen.
Here are some example modifiers:
| Type | Description |
| Melee Attack | Modifies attack rating with melee attacks. |
| Magic Attack | Modifies attack rating with magic attacks. |
| Melee Defense | Modifies defense rating against melee attacks. |
| Magic Defense | Modifies defense rating against magic attacks. |
| Damage | Modifies the damage done in combat. |
There are many more modifiers that can affect how you perform in combat and the game. Always be on the lookout to find beneficial modifiers!
Defenses
As mentioned above, each character has a baseline defensive capability equal to their character level. This is automatically used during combat. There is no need for a character to actively train their defensive skills.
However, there are still three types of defensive actions that are performed during combat: dodging, parrying and blocking with a shield. Each action is effective in different ways:
| Type | Item Required | Block Magic? | Description |
| Dodge | N/A | Yes | You try to evade incoming attacks! |
| Parry | Equipped Weapon | No | You use your currently equipped weapon to deflect melee attacks. If you do not have an equipped weapon you are not able to block attacks. You cannot parry magic attacks. |
| Shield Block | Equipped Shield | Yes | You use your currently equipped shield to deflect any attacks. If you do not have an equipped shield you are not able to block attacks. You can block magic attacks. |
Defensive Maneuvers
Defensive Maneuvers is a skill that every character gets. It gives a passive increase to your defensive rating. The skill has 10 levels and each level will reward the character with a bonus to defensive rolls.
Important!
This skill will level up automatically when attacked! It will be very beneficial to train this skill as much as possible.Getting Hit
If you fail a defense, you will take damage. There are many places where you can be hit:
Head, chest, left arm, right arm, left leg, and right leg. There are damage modifiers on each part. For example you would take more damage from a blow to the head rather than the right arm.
If you have armor equipped it will deduct damage. Sometimes if you have good armor it will block all of the damage and your health will not be decreased.
Important!
Equipment can become damaged in combat. To repair your items, visit the Forge in Tralisia’s Merchant District.
Armor
Armor can be bought to protect portions(head, chest, arms and legs) of your body. Chest armor protects every spot of your body. Arm guards protect the arms. Legs protect the legs. Helmets protect the head.
Important!
The game is balanced to assume the player has purchased the right armor and all armor pieces (chest, helmet, arms, legs and shield) for their level.Armor Types
There are three major armor types in the game: leather, chain and plate. Each protect against different attacks in different ways:
| Type | Sharp Attacks | Blunt Attacks | Thrust Attacks | Benefit |
| Leather | Weak | Good | Good | Has least amount of hindrance and low protection. Lower hindrance offers many combat bonuses. Rogues get a bonus. |
| Chain | Good | Weak | Very Good | Has moderate hindrance but has good protection. |
| Plate | Very Good | Weak | None | Has high hindrance has great protection. |
Different monsters and players use varying attacks so always be aware of what armor you’re wearing.
Important!
Plate armor offers an additional damage reduction of 10-20%, lowers bleeding and a chance to completely avoid being cut.Shield Types
There are three major shield types in the game: buckler, kite and tower. Each protect against different attacks in different ways:
| Type | Auto Block Bonus |
Special Attack Block Chance |
Special Attack Damage Mitigation |
| Buckler | None | Very High | Low |
| Kite | Medium | Medium | Medium |
| Tower | High | Low | High |
All shields have a base auto-block chance against normal attacks. This chance is based on the material type of the shield used. For example, an orinsteel shield will have a better base auto-block chance than a wooden shield would.
The shield type simply adds to this base auto-block chance. If a wooden shield had an auto-block chance of 1%, the buckler would not add to this while the kite shield would add an extra value to this.
Hindrance
The game has a hindrance system for armor and shields. A higher hindrance will lower the offensive and defensive capabilities of your character. To see your current hindrance type hindrance:
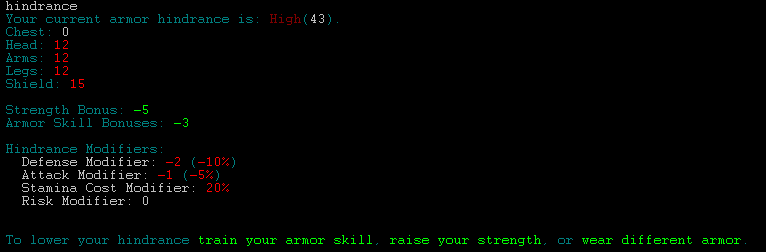
Hindrance
To lower hindrance of armor, it is advisable to train the armor skills, raise the strength attribute or simply wear less hindering armor.
Hindrance Modifiers
Hindrance has several modifiers which range from a bonus to a negative depending on the final hindrance modifier.
| Modifier | Description |
| Defense | Increases or decreases defense rating in combat. |
| Attack | Increases or decreases defense rating in combat. |
| Stamina Cost | Increases or decreases the Stamina cost of abilities. |
| Risk Modifier | Increases or decreases the risk modifier of attacks and abilities. |
| Dodge | Increases the dodge chance of avoiding incoming attacks. |
When the hindrance is high the modifiers will be negative. When hindrance is low the modifiers will be positive.
While having a high hindrance will generally make your character slower in combat, the added protection in armor offsets this. Plate is extremely effective at blocking damage. A lower hindrance will make your character faster but this usually comes at a cost of protective armor (leather).
The following breaks down the hindrance rankings:
| Threshold | Description |
| +50 | High penalties. |
| 30-49 | Lower penalties. |
| ~30 | Threshold for bonus/lower penalties |
| 20-29 | Increased appearance of bonuses. Almost complete removal of penalties. |
| 10-19 | Many bonuses! |
| 0-9 | Extreme bonuses due to low hindrance!! |
Important!
Having high hindrance is not the end of the world. There are many bonuses in the game that boost attack and defense. These can easily offset many of the penalties.Hindrance Ratings
The hindrance ratings for armor depend on the type (leather, chain and plate). The values are not affected by weight or material used. This is done for simplicity.
The values are:
| Armor | Chest Hindrance | Other Hindrance |
| Leather | Low (18) | Low (6) |
| Chain | Medium (36) | Medium (14) |
| Plate | High (46) | High (18) |
The hindrance ratings for shield are similar to armor types.
The values are:
| Shield | Hindrance |
| Buckler | Low (5) |
| Kite | Medium (10) |
| Tower | High (15) |
Important!
Hindrance can be seen while inspecting items, under hindrance, in score and under attackinfo.Important!
To lower hindrance of armor, it is advisable to train the armor skills, raise the strength attribute or simply wear different less hindering armor.Lowering Hindrance
There are several ways to lower hindrance:
- Get more strength.
- Train armor skills.
- Train shield training (assuming you’re using a shield).
- Some rare skills can lower hindrance.
- Wear armor that benefits your class.
- Do not mix and match armor types unless you have high skills in each.
Important!
While it may seem like a good idea wearing only your chest piece and forgo other pieces for the hindrance bonuses, be careful. Completely forgoing the protective benefits of armor may cause your character more harm than good.In all cases, experiment and see how things work out.
Notice
Keep in mind that higher leveled monsters are balanced against a character wearing all pieces of armor.Bleeding
During combat you can suffer wounds which will bleed. To see your wounds type HEALTH. The display follows as:
Health Screen
If you had wounds it would look like so:
Wounded!
Having a wound will cause your character to bleed every update. If the wound is not healed it may kill you. Wounds have a chance to close on their own, but a better way is to bind your wounds.
Bind wounds is a skill that can be learned at a trainer and applies first aid to a character, including yourself.
The syntax is: bind <target>
Important!
You can use bind wounds on someone even if they have no wounds! Doing so will restore a small amount of health.If a wound has a projectile, such as an arrow, lodged into, it must first be removed! You may use the REMOVE command.
remove fromwound arrow
Vitals
Each character has certain vitals that are important to them. They consist of Health, Stamina, Essence and Favors.
Health is used to determine what state your body is currently in. When it reaches 0, you die. In order to restore health, simply rest – it will regenerate over time.
Stamina is used as power for melee attacks(such as cleave or backstab) and skills. The more these attacks are used the quicker the stamina drain is. To restore stamina, simply rest – it will regenerate over time.
Essence is used to cast magic spells! To regain essence use Channel or Intervention. See the Magic page for more information!
Favors are used by Clerics to pray for gifts from their Entites. Favors regenerate every minute. To see more on Favors, visit the Cleric Page.
Notice
If you’re low on health in combat run away!
Movement and Distance
Movement in combat is possible in A Tempest Season. All attacks have a distance that can be used within.
Each room is broken up into a number of units, each consisting of 5 feet. A player and NPC can move a certain amount of units each move, which depends on their attributes and hindrance.
Assessing
To see everyone’s location in a room, use the ASSESS command:
assess
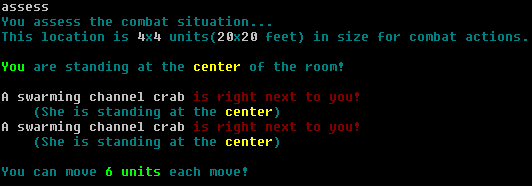 By default, everyone is in the center of the room.
Moving
To move in a room, use the advance, retreat, or move command.
Advancing (moving forward):
advance <units>
ie: advance 2
advance <target>
ie: advance stalker
Retreating (moving backwards):
retreat <units>
ie: retreat 2
retreat <target>
ie: retreat stalker
Notice
It is possible to fall down while retreating in combat!
Move combines advance and retreat into a single command:
move +/-<units>
ie: move -2
move <target>
ie: move stalker
Risk
Combat is a risky business. Movements, attacks, and a collection of factors affect the outcome of a battle. By far risk is a deciding one.
Combat is a risky business. Movements, attacks, and a collection of factors affect the
outcome of a battle. By far risk is a deciding one.
There are 3 parts to the risk system:
1. Position: this changes when you are fighting. Every action you perform and attack you
receive modifies your position. Being in a red(bad) position will lower your defense, your
damage output(-35%) and make you more susceptible to knock downs. Staying in a green(good)
position will increase your defense, increase your damage output(+10%), and be less
susceptible to knock downs. These modifiers apply to both players and NPCs. To maintain a
good position, it is important to combo attacks and abilities. For example: interweave high
risk attacks(cleave) with lower risk attacks(slash).
2. Morale: Starting at level 30, the Morale System unlocks. Every NPC has a Posture(1 of 4
types) which you use the corresponding skill to steadily build self-buffs when killing
them.
3. Weakness: Starting at level 30, the Weakness System unlocks. Every NPC has a certain
Posture which you use the corresponding skill to exploit weaknesses during each attack.
As stated above in the attacks section, attacks raise and lower your risk. The combat systems expects a player to be able to combo their attacks in some way that fits their play style and current situation. The most ideal situation, however, is to combine high damaging and risky attacks (such as Cleave) with low damaging lowering-risk attacks (such as Slash). This will allow you to deal damage with Cleave, but make sure your risk does not get high by using Slash.
Important!
A good combination is to use a high risk attack once then a quick succession of low risk attacks to reduce your risk level. This will keep an optimal length of high risk to low risk attacks.Risk Levels
There are 11 levels of risk, each color coded to give the player an idea of their current situation.
| Position | Description | Tips |
| Rock Solid | Massive Bonus to Defenses; Bonus to Damage | Use a High Damage-High Risk attack! |
| Very Strong | Bonus to Defenses/Damage | Use a High Damage-High Risk attack! |
| Strong | Bonus to Defenses/Damage | Use a High Damage-High Risk attack! |
| Very Good | Bonus to Defenses/Damage | Use a High Damage-High Risk attack! |
| Good | Bonus to Defenses/Damage | Use a Medium Damage-Medium Risk attack! |
| Neutral | No Bonuses | |
| Weak | Penalty to Defenses/Damage | Use a Medium Damage-Medium Risk attack! |
| Very Weak | Penalty to Defenses/Damage | Raise your risk! Use Slash/Pound/Jab/Expose! |
| Unsteady | Penalty to Defenses/Damage | Raise your risk! Use Slash/Pound/Jab/Expose! |
| Very Unsteady | Penalty to Defenses/Damage | Raise your risk! Use Slash/Pound/Jab/Expose! |
| Feeble | Massive Penalty to Defenses/Damage | Don’t get here – you’ll be toast!! |
Important!
A good combination is to use a high risk attack once then a quick succession of low risk attacks to reduce your risk level. This will keep an optimal length of high risk to low risk attacks.Postures and Morale
Starting at level 30, you can turn on postures which are used to build morale when killing
NPCs and to exploit weaknesses during attacks. Each NPC has a specific posture and it is up
to you to discover each while fighting them.
The postures are:
| Name |
| Form |
| Dominance |
| Movement |
| Mind |
In order to build the most morale and exploit weaknesses against NPCs, the matching posture
must be active. For example, if a mud stalker has Posture: Form, you must also have that
posture active to build morale and exploit weaknesses.
Each time a NPC is killed, you gain morale if you stayed in the Green
positions. More morale is gained if you are in the same Postures as the NPC. There are 3
Morale states and each gives a cumulative bonus to the player. The states are:
| Name |
| Eager |
| Steady |
| Determined |
Morale decays if not actively engaged in combat. Also, switching Postures will completely
remove all morale.
Additionally, each NPC has a weakness which can be exploited on every attack if the same
Postures is currently active.
It is up to you to discover each NPCs Postures in order to build high morale states and to
exploit their weaknesses. There are 3 ways to determine a NPCs Posture:
1. If you get more than 5% morale after killing a NPC while in Green positions,
2. You afflict a weakness on the NPC,
3. You use Detect Magic on the NPC.
Weaknesses
There are several types of Postures you may use to build morale and exploit weaknesses
against NPCs. Each NPC has a weakness which can be exploited on every attack if the same
Postures is currently active.
When a weakness is exploited, the NPC suffers a short term debuff based on the player’s
Postures.
It is up to you to discover each NPCs Posture in order to build high morale states and to
exploit their weaknesses.
Death
The world of Eihydia is a dangerous place and there will eventually be a time when you meet your fate at the hands of another.
When your character reaches 0 health, they will perish. Your body will fall and become a corpse in the room, and you will remain there. At this point, two options await you:
- Resurrection by a Cleric.
- Releasing your body by typing ‘die’. Dying will incur experience debt if not over level 10. You’ll be returned to the center of town or to your place of deity’s place of worship, if it exists.
Other Topics
Equipment
Your equipment will wear down overtime. You can repair your items at the Forge in Tralisia for a small fee, based on weapon price.
When an item becomes damaged you will receive messages and the word damaged will print out next to the item in your inventory screen. If you do not repair the item and it breaks – the item is gone forever. You can repair most items as many time as you want.
Weapons take damage from attacking and from parrying. Armor takes damaged from being hit.
Error!
Remember, if the item breaks it is lost forever. Don’t forget to repair!!Fleeing
There is no FLEE command in A Tempest Season. If combat is not going well – simply walk away. While the combat is challenging in A Tempest Season, we don’t want to automatically penalize a player for not doing well. So run out of the room, rest up and get your revenge!
Notice
Before running away, make sure you type LOOK or EXITS to see where you can run too!Getting Loot
Getting loot is important! There are currently two ways to get loot from a defeated enemy:
Getting all the items from their corpse and stripping.
Getting
To get all of the items from a corpse, use the get command. This command will take an item from the corpse and place it your inventory.
The syntax is: get <item> corpse
Important!
You can use get all! Typing get all corpse will remove all of the items from the corpse.Notice
However, you’ll be placed in a delay for each item looted.Stripping
Stripping places all of the items a NPC corpse has onto the ground, in the room. In addition, it can be used to strip items from players.
To strip a NPC, simply type: strip corpse
Stripping items from players requires more typing as it’s a very powerful command. It is possible to strip items both from a player’s inventory and equipment.
The syntax is:
strip <(inv)entory|(eq)uipment> <item> [from] <player>
Important!
Stripping items from players incurs a large delay.Error!
While the staff does not actively condone abuse of the strip command against players, it is valid in RP.Prompt
The prompt is displayed to your character after every thing you see or do. This a line that gives useful information about your character.

Above, the H represents Health, the S represents Stamina and E represents Essence.
This allows you to easily ascertain the state of your character. Additional information such as if you’re knocked down, hidden and your current risk position will be displayed here.
Important!
You can change your prompt! Type prompt in game to see how!General Tips
Here are some basic tips that will help you get started:
- Always stay in a GREEN risk position!
- Combo high risk attacks with low ones.
- If you’re in trouble – run away and use bind wounds.
- Always train your main attack skill (weapon skill, or sorcery) and defensive maneuvers.
- Look at a NPC to see how easy they will be to hit.
- Keep your equipment up to date!
- Train your abilities!
- Gain another level to automatically increase your attack and defense.
Getting Help
We realize that combat can be intensive and difficult at first to master. Here are some resources to assist you:
- Ask on the NEWBIE channel.
- Post on the forums for help.
- Ask the staff for assistance (in particular Dayrinni). Use the ORACLE command or send a tell to contact the staff. The staff will come to your aid and help in any way they come. We are here for YOU, the player. Alternatively, you may contact Dayrinni here.
Important!
Remember, if you need help – ask for it and someone will be there for you.